by Cozmot | Oct 8, 2020 | Magento2
Sending an invoice via email to customers as soon as they buy a product from our E-commerce store not only improves the user experience but also boosts brand identity, helps in legal issues, and reduces invoice disputes.
The default Magento 2 offers multiple options to configure invoice emails to select the email sender, its template, and add multiple email addresses to send the invoice email copy.
For instance, an invoice email copy has to be sent to the admin, store owner, as well as financial manager along with the customer. The feasible option is to configure invoice emails in Magento 2 in such a way that these settings need not be set for each invoice.
The post shows the method for the same.
Steps to Configure Invoice Emails in Magento 2:

-
Login to Magento 2 admin panel
-
Navigate to Stores > Settings > Configuration
-
Under Sales, select Sales Emails
-
Expand the Invoice section
-
The default option is set as Enabled that explains the invoice email will be sent to customers when the customer orders a product.
-
In Invoice Email Sender, select the person from whom the invoice email will be sent. The default Magento 2 offers five email addresses.
-
In Invoice Email Template, select the template based on your requirement or select the default option.
-
In Invoice Email Template for Guests, choose the template for customers who have not created an account in your store.
-
In Send Invoice Email Copy To, enter the multiple email addresses to whom you want to send invoice email copy. Separate email addresses with a comma.
-
Send Invoice Email Copy Method, select bcc(blind carbon copy) or separate email copy method based on your requirement.
-
Click Save Config
That’s it.
If you have queries, feel free to ask in the Comment section below.
I would like to solve your problem.
Don’t forget to share this post with Magento Community via social media.
Thank you.
]]>

by Cozmot | Oct 8, 2020 | Magento2
Magento 2 order comments are displayed on the backend order view as well as the on the frontend with order summary and in the order confirmation email.
The admin has to configure order comments in Magento 2 according to the business requirement of where to display the order comments.
These order comments are helpful to understand any notes along with the order that an admin needs to know. The order comments can also be emailed to multiple recipients who are in charge of order management.
The default Magento 2 offers a feature to select the sender and template of the order comment copy as shown in the post here.
Steps to Configure Order Comments in Magento 2:
-
Login to Magento 2 admin panel
-
Navigate to Stores > Settings > Configuration
-
Under Sales, select Sales Email
-
Expand Order Comments area
-
The default option is set as Enabled that explains the order comment email will be sent to customers when the customer orders a product.
-
In Order Comment Email Sender, select the person from whom the order comment email will be sent. The default Magento 2 offers five email addresses.
-
In Order Comment Email Template, select the template based on your requirement or select the default option.
-
In Order Comment Email Template for Guests, choose the template for customers who have not created an account in your store.
-
In Send Order Comment Email Copy To, enter the multiple email addresses to whom you want to send order comment email copy. Separate email addresses with a comma.
-
Send Order Comment Email Copy Method, select bcc(blind carbon copy) or separate email copy method based on your requirement.
-
Click Save Config
That’s it.
If you have queries regarding this post, feel free to ask in the Comment section below.
I would like to solve your queries.
Do consider sharing this post with Magento Community via social media.
Thanks.
]]>

by Cozmot | Oct 8, 2020 | Magento2
Pagination Controls is the format from Magento 2 product listing.
The default Magento 2 allows the admin to configure the pagination controls from the admin panel for better control at the top and bottom of the product list from the frontend.
A medium or large store with a larger number of products must leverage the pagination facility for better visibility and ease in browsing the online store.
Instead of displaying numerous products on a single website, Magento 2 offers pagination so that there would be a limited number of products on the page to display and customers can view products easily by accessing pagination control.
Benefits of pagination controls in Magento 2 store:
Without pagination, the Magento 2 store may take more time to load all the products. Pagination control helps reduce loading time because it limits the number of products to display on the web page.
Also, the customers may not prefer to scroll down several times for viewing the products. Therefore, the pagination control is useful to increase the onsite experience as well.
However, you can skip configuring Magento 2 pagination if you offer fewer products only.
Steps to Configure Pagination Controls in Magento 2:
-
Login to Magento 2 admin panel
-
Navigate to Content > Design > Configuration
-
Select your theme and Select Edit under select Action column.
-
Expand Pagination section
-
In Pagination Frame, enter the number of frames that you want to display on the frontend.
-
In Pagination Frame Skip, leave it default. There is no need to change.
-
In Anchor Text for Previous, enter the text for showing ‘previous’ on the frontend.
-
In Anchor Text for Next, enter the text for showing ‘next’ on the frontend.
-
Click Save Config
Now, in the frontend, you can see the pagination controls configured in Magento 2 category page:

That’s it.
If you have queries regarding this article, feel free to ask in the Comments section below.
I would be happy to help you.
Do consider sharing this post with Magento Community via social media.
Thank you.
]]>

by Cozmot | Oct 8, 2020 | Magento2
The merchants can configure invoice email in Magento 2 to select the email sender, its template, and add multiple email addresses to send the invoice email copy.
If a merchant wants to attach order-related information with an invoice, it is easy to do so with the steps to configure invoice comments in Magento 2.
Invoices are extremely important for every E-commerce store. It includes details like product name, product price, purchase date, name of a buyer, and other payment details. Invoices are the official record of the sales and improving it contributes to gaining customers’ trust.
The Magento 2 invoice comments can be also displayed in the frontend by enabling the below checkboxes:
The invoice comment in frontend:

Steps to Configure Invoice Comments in Magento 2:

-
Login to Magento 2 admin panel
-
Navigate to Stores > Settings > Configuration
-
Under Sales, select Sales Email
-
Expand Invoice Comments section:
-
The default option is set as Enabled that explains the invoice comment email will be sent to customers when the customer orders a product.
-
In Invoice Comment Email Sender, select the person from whom the invoice comment email will be sent. The default Magento 2 offers five email addresses.
-
In Invoice Comment Email Template, select the template based on your requirement or select the default option.
-
In Invoice Comment Email Template for Guests, choose the template for customers who have not created an account in your store.
-
In Invoice Comment Email Copy To, enter the multiple email addresses to whom you want to send invoice comment email copy. Separate email addresses with a comma.
-
Send Invoice Comment Email Copy Method, select bcc(blind carbon copy) or separate email copy method based on your requirement.
-
Click Save Config
That’s it.
Let me know if you have any queries regarding this blog in the Comment section below.
I would like to solve your queries.
Share this post with Magento Community via social media.
Thanks
]]>

by Cozmot | Oct 8, 2020 | Magento2
The default Magento 2 allows the merchants to send shipment comments in the Email.
In E-commerce, product delivery is managed by the delivery partner most of the time. Therefore, if there is any kind of change in shipment, it is necessary to inform.
If the Magento 2 store has partnered with local stores and the products are being delivered by local stores, the Magento 2 store owner needs to inform the local store if there is any change in shipment.
Shipment comments are also useful for sending order tracking information such as order ID.
Magento 2 also allows sending the shipment comments in the shipment email as well as display it in the frontend under “My Accounts” section. The admin can do so by enabling the below-shown checkboxes from the backend:
The shipment comment in frontend:
 Follow these easy steps to configure shipment comments in Magento 2.
Steps to Configure Shipment Comments in Magento 2:
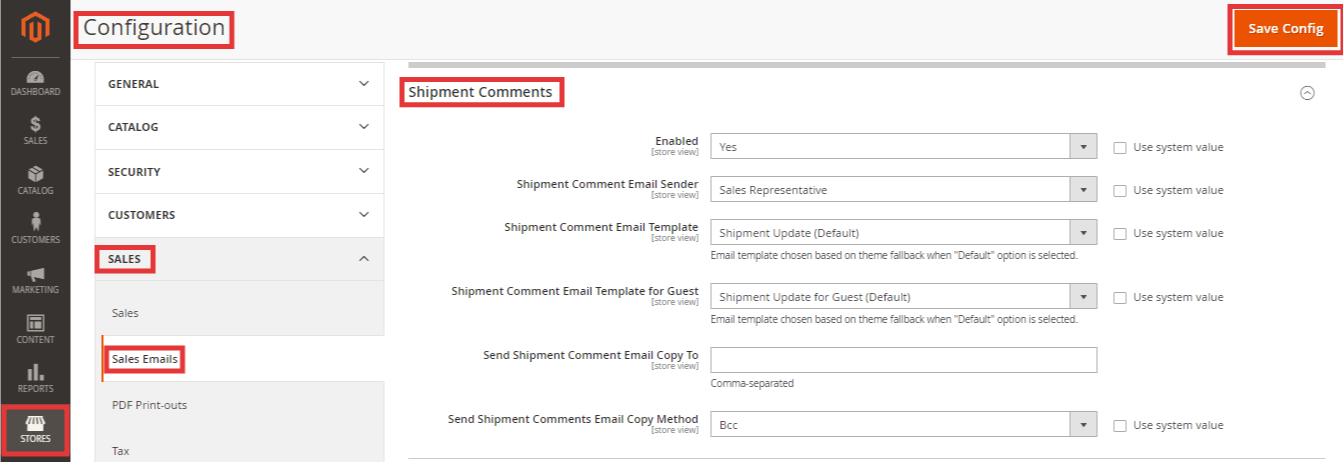
- Login to Magento 2 admin panel
- Navigate to Stores > Settings > Configuration
- Under Sales, select Sales Email
- Expand Shipment Comments section
- The default option is set as Enabled that explains the shipment comment email will be sent to customers when the customer orders a product.
- In Shipment Comment Email Sender, select the person from whom the shipment comment email will be sent. The default Magento 2 offers five email addresses.
- In Shipment Comment Email Template, select the template based on your requirement or select the default option.
- In Shipment Comment Email Template for Guests, choose the template for customers who have not created an account in your store.
- In Shipment Comment Email Copy To, enter the multiple email addresses to whom you want to send Shipment comment email copy. Separate email addresses with a comma.
- Send Shipment Comment Email Copy Method, select bcc(blind carbon copy) or separate email copy method based on your requirement.
- Click Save Config
That’s it.
If you have questions regarding this solution, please mention them in the Comments section below.
I would like to solve your queries.
Also, do share this post with Magento Community via social media.
Thank you.]]>